Solar Smart Blinds Enter the Mainstream: Environmental Advantages for 2025
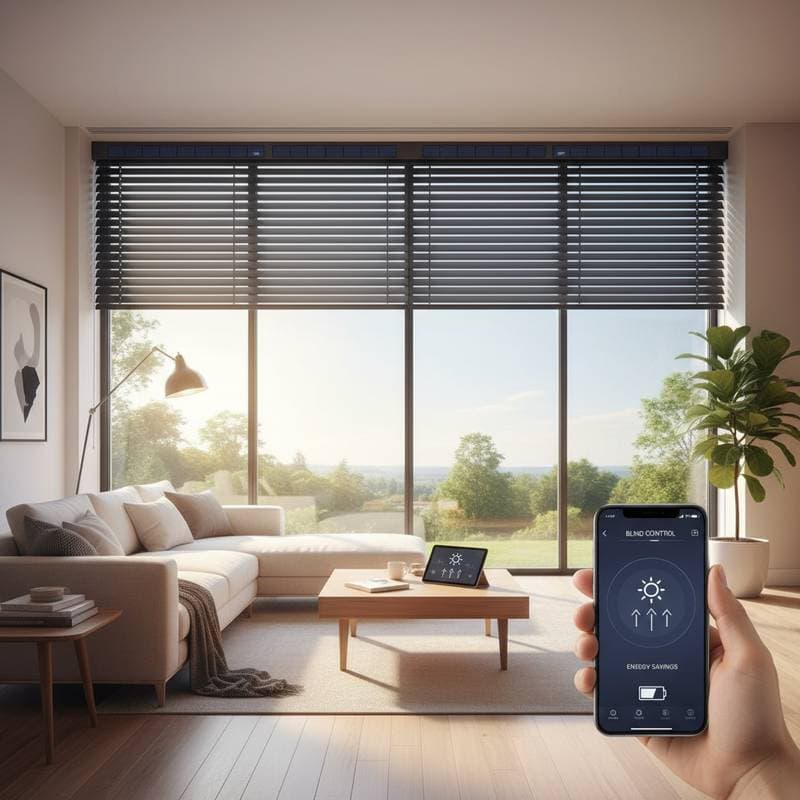
Window shades that harness sunlight for power and respond to smartphone commands represent a shift from luxury to essential home feature. Solar smart blinds deliver energy efficiency, automated control, and sustainable operation. Homeowners benefit from reduced utility bills, seamless integration with intelligent systems, and minimal installation demands.
Windows often serve as primary sources of energy loss in heating and cooling. This article explains the mechanics of solar blinds, associated costs, and strategies for energy conservation without extensive electrical modifications. Consider environmental factors, as certain windows and regions may require supplementary power sources.
Essential Knowledge
Solar smart blinds incorporate a compact photovoltaic panel that converts sunlight into energy to charge an internal battery, which drives the motorized mechanism. Users operate the blinds via remote control, mobile application, or voice-activated assistants. Direct sunlight proves crucial; shaded windows might generate insufficient power for reliable automation. Verify the system's energy output prior to selection, particularly for expansive or high windows, to ensure consistent performance.
Required Tools and Materials
- Microfiber cloth for gentle cleaning of the solar panel
- Diluted dish soap or mild window cleaner
- Screwdriver or power drill for securing mounting brackets
- Measuring tape for precise dimensions
- Optional rechargeable battery pack for areas with limited sunlight
Installation Guide
Step 1: Measure the Window
Determine the interior width and height of the window frame. Record measurements to the nearest eighth of an inch. Precise sizing guarantees a secure fit and optimal positioning of the solar panel for sunlight exposure.
Step 2: Evaluate Sunlight Availability
Observe the window throughout the day to assess hours of direct sunlight. South- or west-facing orientations typically yield the best results. Obstructions such as dense foliage or overhangs may necessitate an additional battery for support.
Step 3: Install Mounting Brackets
Identify and mark bracket positions on the frame. Drill pilot holes, then fasten the brackets with screws. Ensure level alignment to prevent operational issues during movement.
Step 4: Secure the Headrail
Insert the headrail into the brackets until it locks in place. Position the solar panel to face outward for maximum light capture. Clean the panel surface to remove any residue.
Step 5: Activate and Connect
Adhere to the manufacturer's instructions for initial setup. Press the designated button on the motor to pair with the application or remote. Perform a test cycle to verify smooth operation.
Step 6: Configure Schedules
Access the system's programming features to set automated timings. Align openings with sunrise and closings with sunset to regulate thermal gain and enhance privacy.
Step 7: Maintain the Solar Panel
Wipe the panel with a damp microfiber cloth every few weeks. Accumulated dust or smudges diminish charging efficiency.
Step 8: Adapt to Seasonal Changes
During summer, position blinds to block intense midday sun and maintain cooler interiors. In winter, allow sunlight entry to passively heat rooms.
Step 9: Monitor Battery Performance
If operation falters, review the charge status through the app. Connect a USB cable or auxiliary panel for manual recharging as required.
Best Practices and Precautions
Recommended Actions
- Select windows receiving at least two hours of direct sunlight each day.
- Perform regular cleaning of the solar panel to sustain power levels.
- Opt for neutral or light-colored fabrics to maximize heat reflection.
- Evaluate motor noise levels prior to purchase for quiet environments like bedrooms.
Actions to Avoid
- Position blinds behind thick drapes that obstruct the solar panel.
- Apply cleaning solutions directly to the panel; dampen the cloth instead.
- Neglect software updates for connected devices.
- Manually adjust blinds while the motor engages.
Professional Assistance Indicators
Engage a specialist for oversized, arched, or elevated windows. Experts manage hybrid configurations that incorporate plug-in options for subdued lighting. Professional integration with established smart home networks prevents warranty issues or electrical faults.
Investment and Timeline Overview
Basic solar smart blinds range from 150 to 400 dollars per window. Customization for dimensions or materials increases expenses. Self-installation requires approximately 30 minutes per window. Professional services add 50 to 100 dollars, influenced by scale and features. Key factors include window proportions, fabric selections, motor durability, and digital functionalities.
Ongoing Care Schedule
- Monthly Tasks: Dust the slats and solar panel using a dry cloth.
- Quarterly Checks: Assess motor functionality and recalibrate if delays occur.
- Annual Inspections: Examine brackets for secure fastening.
- Immediate Responses: Address slowdowns, app disconnections, or battery levels below 30 percent persisting over three days.
Rising Popularity of Solar Smart Blinds
These systems combine energy reduction, ease of use, and security into a single solution. Advanced photovoltaic elements sustain motor activity for extended periods, even under variable weather. Technology advancements lower costs while enhancing reliability. As energy consultant Dr. Lena Ortiz of GreenEdge Design observes, "Solar blinds close the gap between passive design and active energy control." This integration enables precise management of illumination and climate without invasive setups.
Proper programming minimizes summer heat accumulation and winter warmth escape, easing demands on heating, ventilation, and air conditioning units. Pairing with intelligent thermostats amplifies overall efficiency for discerning homeowners.
Selecting an Optimal Model
Prioritize units with fully integrated solar motors over add-on components for cleaner aesthetics and simpler upkeep. Fabric options influence performance: light-filtering varieties diffuse natural light while curbing glare, whereas blackout materials suit restful or entertainment spaces. For heavier wood or simulated wood slats, confirm motor compatibility with the weight.
Verify app ecosystem alignment with current home automation protocols. Connectivity varies between Wi-Fi, Bluetooth, or dedicated hubs. Ensure voice assistant synchronization if applicable.
Environmental and Aesthetic Advantages
Solar smart blinds promote sustainability by generating clean energy on-site, diminishing reliance on grid power. They align with green building principles, potentially qualifying for eco-incentives. Aesthetically, sleek designs complement diverse interiors, from minimalist to traditional, without compromising functionality.
Expert Recommendations for Optimal Results
- Install on a single window initially to validate sunlight adequacy and control responsiveness.
- Target east, south, or west exposures for superior energy harvest.
- Maintain a reserve battery for overcast durations or low-light zones.
- Utilize non-invasive clips for rental properties to preserve surfaces.
- Document pre- and post-installation energy consumption to quantify benefits.
Integrating Solar Blinds into Daily Life
Once installed, solar smart blinds operate discreetly, enhancing comfort through subtle adjustments. Homeowners report noticeable drops in energy statements alongside improved ambiance. This technology empowers proactive environmental stewardship, blending innovation with everyday practicality for lasting home improvements.